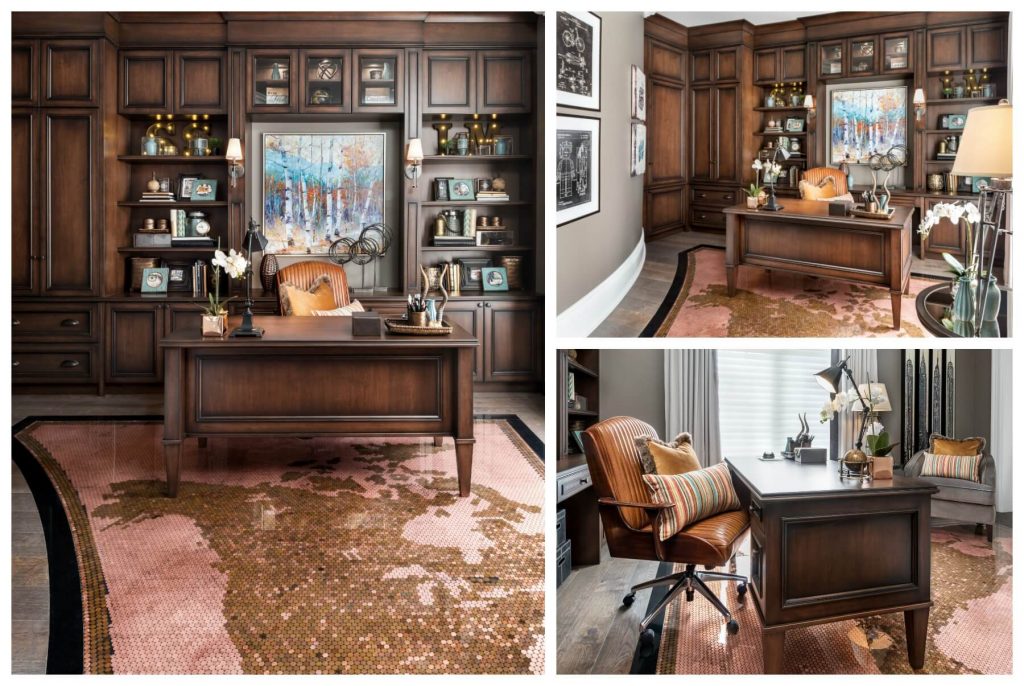
Scott McGillivray’s Penny Floor
If you watched Moving the McGillivrays, the HGTV Canada series about my adventures building my dream home, you know that when I built my house I put a lot of special, personal details into it. One of those details was the massive penny floor in my office. It took almost 30,000 pennies and over a month to install, but it’s one of my favorite features in the house.

The Inspiration
When I was designing my office I knew I wanted to do something special, but the idea of a penny floor had never really crossed my mind. It wasn’t until my daughter Myah started talking about how she wanted to put some of the money from her piggy bank into the house that the idea started to form. My entire career has been built around the phrase “put your money where your house is,” so the more I thought about it, the more I liked the idea. Both Myah and my other daughter Layla got really excited about it, so once the idea was out there we had to do it!
The Design
Deciding to do a penny floor was one thing, but coming up with a design was another. I wanted it to be unique and personal, so I came up with the idea of doing a map. Everyone who knows me knows that I’m a bit of a geography nerd, so it made a lot of sense. Given the shape of the room, doing a full world map would have been a bit awkward, so I decided to stick with Canada and the USA. I have homes and businesses in both Canada and the USA, so I liked the idea of representing both countries.

Collecting the Pennies
One of the most challenging things about the penny floor was collecting enough pennies to fill the space. It takes about 166 pennies to fill a square foot, so in total my floor needed almost 30,000. As much as Myah and Layla wanted to help, their piggy banks didn’t quite cut it! I ended up having to buy the majority of them – but it was still less expensive than other types of flooring material.
Preparing the Pennies
Pennies come in a variety of different shades. New ones tend to be shiny, while old ones tend to be pretty dark. Personally, I like all the different patinas and used them for different parts of the map.
- Shiny new pennies = bodies of water
- Darker pennies = land
That said, I still needed to clean a bunch of them before installing. I dumped them in a solution of vinegar and salt, which dissolved most of the dirt and grime in about 20 seconds. I highly recommend this cleaning method.

The Penny Floor Installation
There are a few different ways to install a penny floor. Some people attach the pennies to a mesh back and then use grout, but I wanted a really specific look, so I laid them out one by one on a black mat, and then sealed it with a clear epoxy finish.
To get the design I wanted I found a basic map template and then traced it out on the floor. One by one, the pennies were laid down. Truth be told, it took a lot of people a lot of hours to fill it in (and by *a lot* I mean almost a month). So while it was definitely the cheapest material I’ve ever worked with, it was one of the most expensive in terms of time and labor.
Once the map was complete we used a sticky pad to lift the pennies up and epoxied underneath. Then we put the pennies back down, removed the sticky pad and epoxied over top. This was definitely the most complicated part of the job – and one that required a lot of patience! To learn more about it you can check out this video on HGTV.ca.

In the end all the time and effort was totally worth it. I love how the floor looks, and my girls love that they had a hand in its creation. Both Myah and Layla were able to donate some of their pennies, and every time they come into my office they feel a sense of pride. As far as I’m concerned, it’s a win win!
Room photos courtesy of HGTV Canada’s Moving the McGillivrays.

Comments